Events

FREE Valentine’s Day Collection

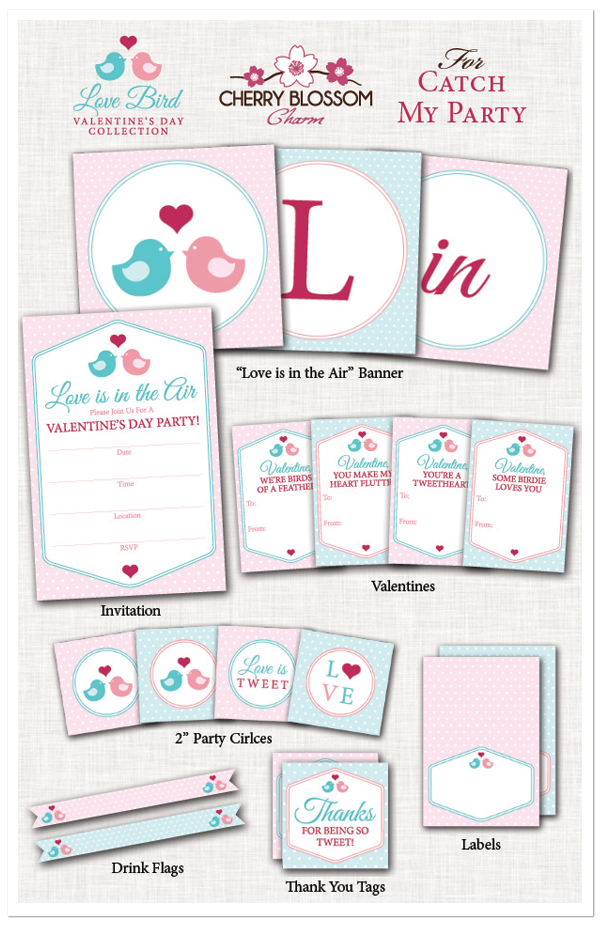
Yesterday I was so excited to see my FREE Love Bird Valentine’s Day Collection featured on Catch My Party! I created this collection exclusively for Catch My Party, and it was so fun to design!

Make sure you head over to their blog to check them out, and you can download the FREE files from their site. :)

Free Valentine's Day Printables

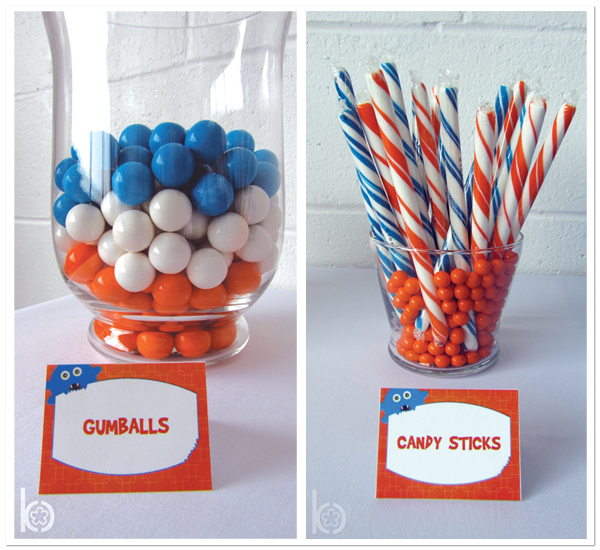
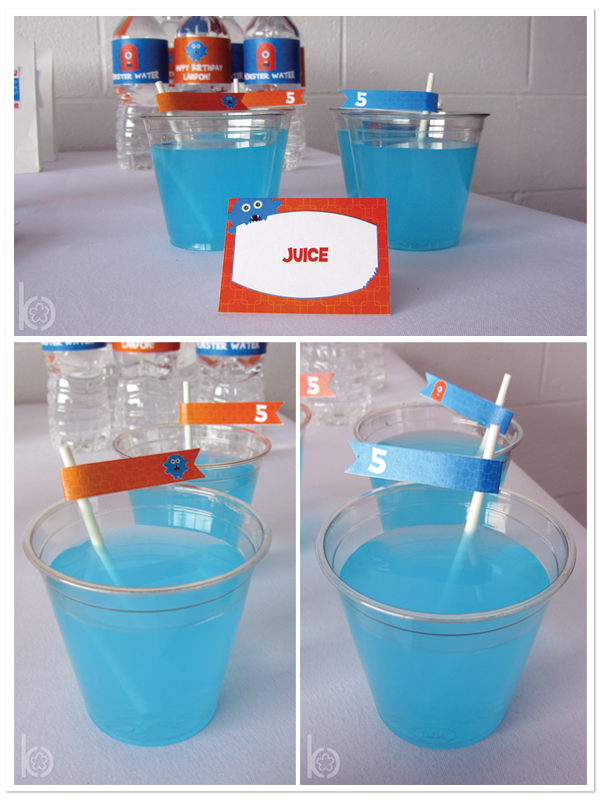
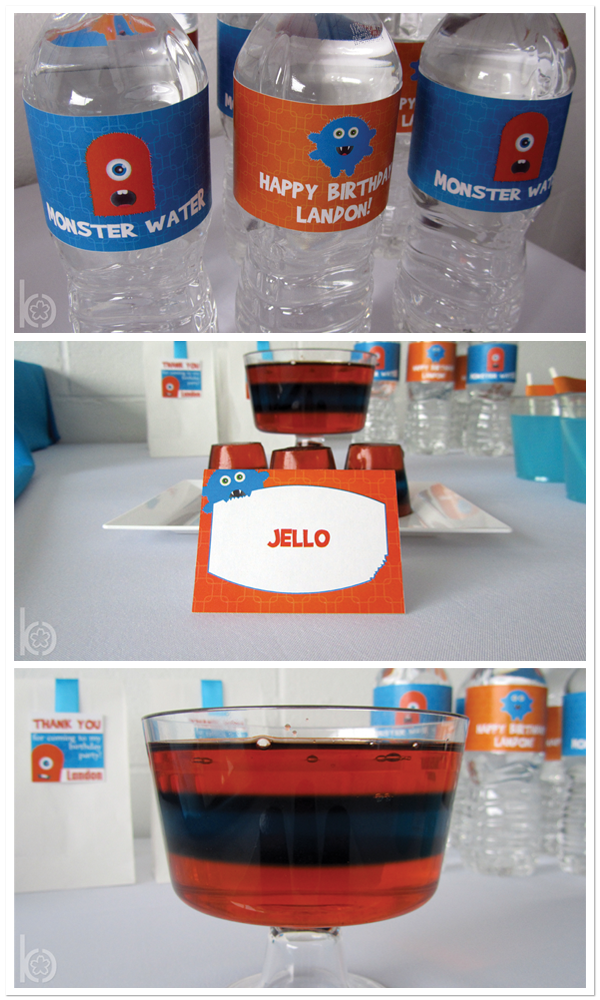
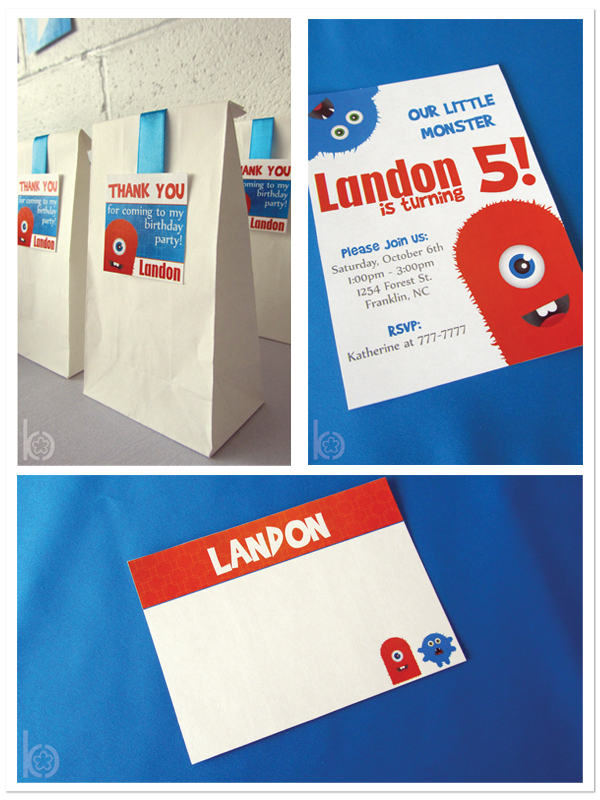
A Monster Birthday Party!

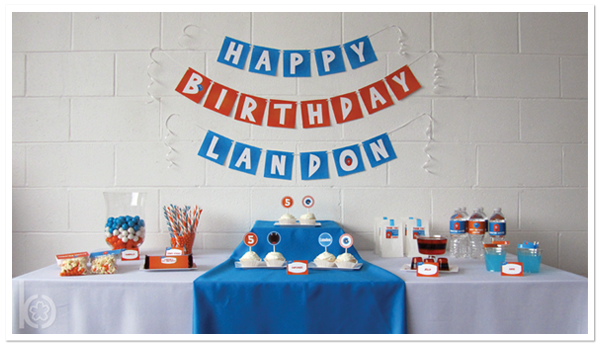
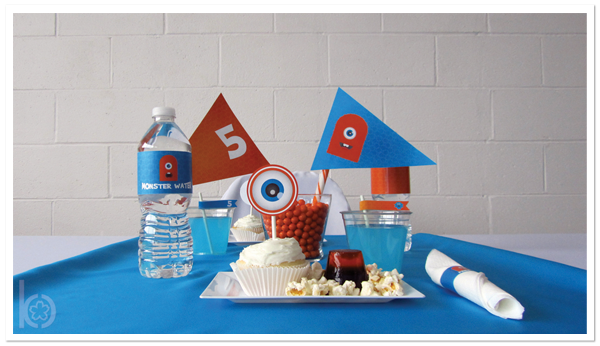
I am so excited to reveal these photos from my latest product photo shoot! Recently I decided to completely overhaul my old “Monster Party Pack” and give it a more fun look. I was so happy with the new design, I had to get to work on styling this party right away.

I really enjoyed setting up and shooting these photos, and I hope they leave you feeling inspired!

Monster Birthday Party Printables

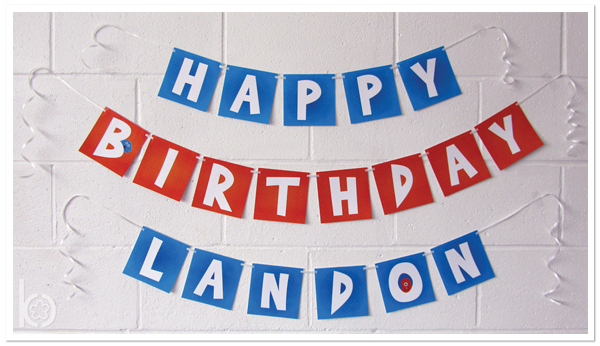
Monster Birthday Party Banner

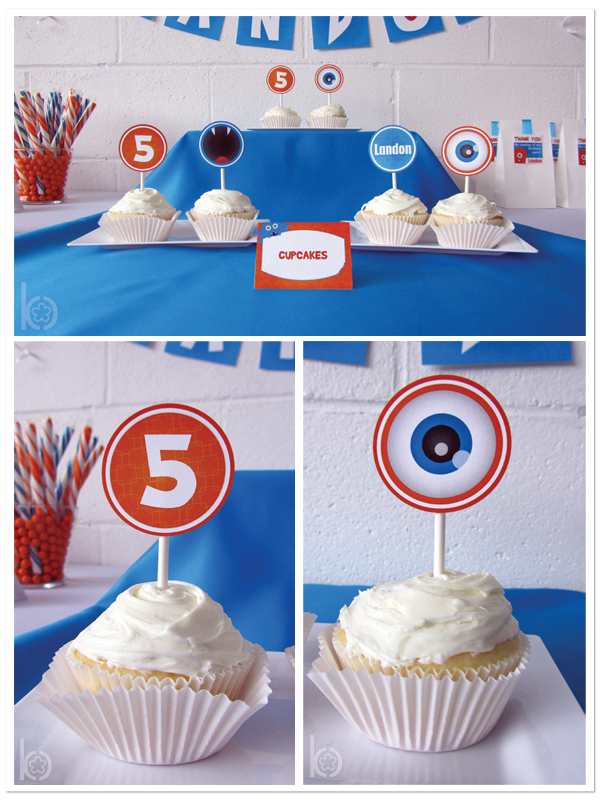
Monster Birthday Party Cupcakes

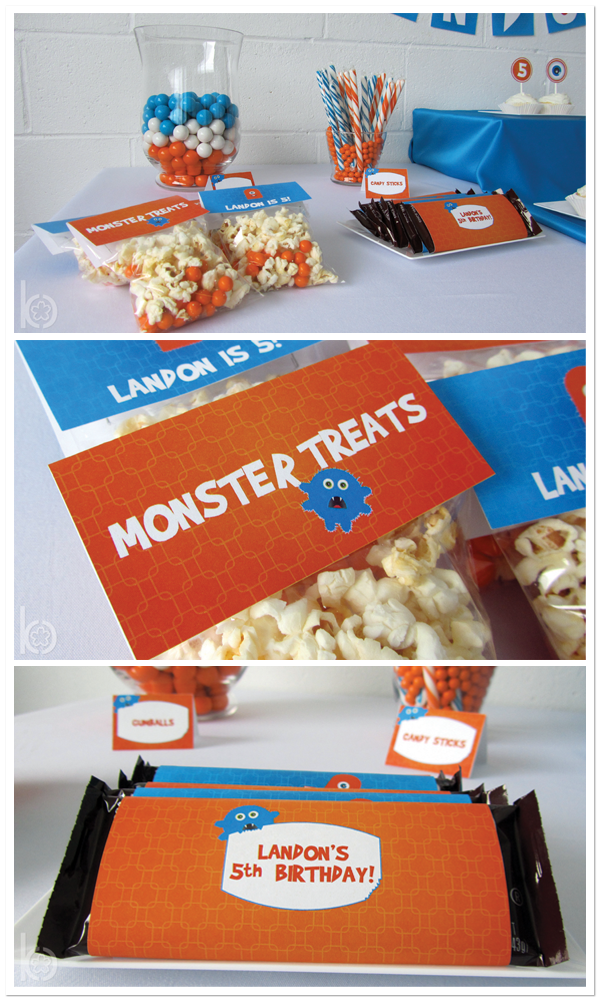
Monster Birthday Party Decor

Monster Birthday PartyMonster Birthday Party

Monster Birthday Party

Monster Birthday Party

Monster Birthday Party Decor

A Damask Birthday Party!

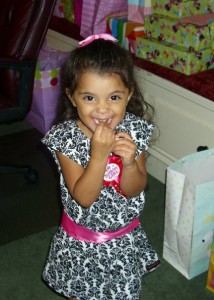
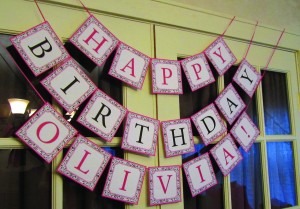
Last weekend was my beautiful niece’s 3rd Birthday Party! My sister purchased an adorable damask and pink dress from Laken and Lila, and asked me to create a party pack to match the dress. What a cute idea!

Here is my niece in her birthday dress:

See, I told you she’s beautiful! ;)

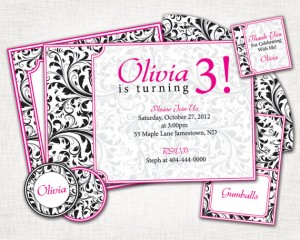
And here’s a photo of her matching party pack:

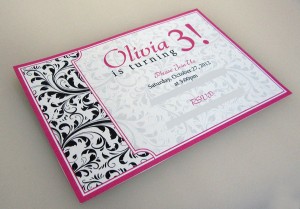
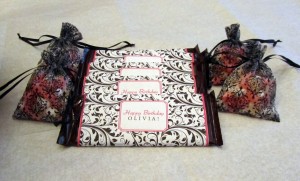
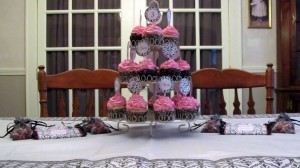
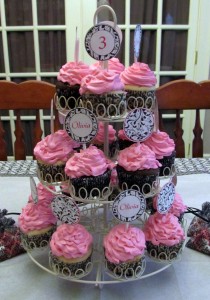
For the party, my sister chose the invitation, cupcake toppers, banner, and candy bar wrappers. Here are some photos from Olivia’s party, held at my parent’s house:


{The damask favor bags are from Michael’s, and the damask table cloth is from K Mart}

My sister made all these gorgeous cupcakes herself!

What an awesome idea to match the dress to the party, I’m loving how perfectly coordinated this event was!

A Rubber Ducky Baby Shower!

{Charmed Event} A Rubber Ducky Baby Shower!

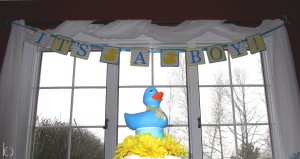
This past weekend, my family held a baby shower for my older sister, Jenny. My mom, and my other sister, Steph, and I all helped to plan the décor/favors for the shower. Jenny wanted lots and lots of rubber ducks, so that’s what we gave her! Everyone loved how it came together, so I thought this would be a great time to share some photos from the shower, and some of our inspiration with you!

{The Invitations}

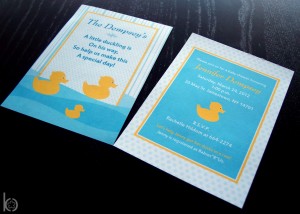
For the invitations, I really wanted to go with a “cute but elegant” look, so I custom designed these invitations for Jenny.

{The Favors}

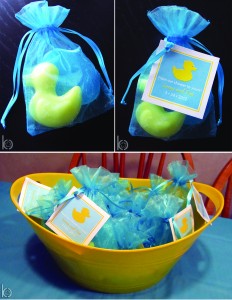
A few months before the shower I was looking up favor ideas for a rubber duck themed shower, and came across some suggestions like bubble bath, and bath soap. I thought these were great ideas to tie in our theme to the favors! My sister, Steph, took it one step further and created two different bath soaps: a yellow duck, and a turquoise bar soap to match the colors of the shower. She even scented them like baby powder! We used favor bags similar (only larger) to the ones found here, and I designed the tags to match the invitations. The turqouise favor bags and bar soap behind the yellow duck helped to give the duck the appearance of being in the water. We found the small, yellow container (I thought it look similar to a tub) at the Dollar Store, and it worked perfectly to hold the favor bags!

{The Food}

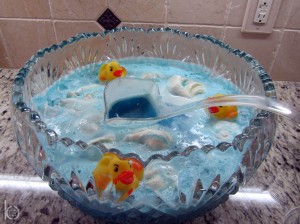
We added a few fun details to the buffet to ensure the food matched the theme of the event. My aunt created the punch by mixing Blue Hawaiian Punch, lemon-lime soda, and vanilla ice cream. My mom found the small ducks that we washed and allowed to float around the punch bowl.

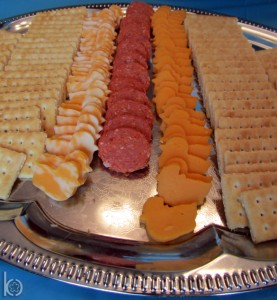
My mom found a small cookie cutter shaped like a duck to cut out all the cheese. A fun way to eat cheese and crackers!

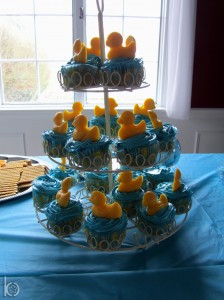
The cupcakes were baked by my mom in duck liners (found at Hobby Lobby), and my sister, Steph, and I frosted them to look like waves. My mom bought the yellow chocolate melts and melted them down in the microwave and put them into a duck mold, then placed them in the fridge to harden. The ducks were placed on top of the frosted cupcakes and put on a cupcake stand.

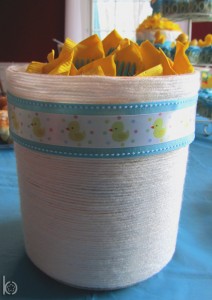
Rather than just putting the silverware out for people to take, I wanted it to have some style so I decorated an empty, plastic pretzel rod container to match the theme. {We used turquoise, plastic silverware wrapped with a yellow napkin. You can’t see it in the picture but I made napkin rings by wrapping ribbon around the rolled napkin and attached the ribbon to itself using a glue dot. I used two different ribbons, a turquoise polka dot, and a duck pattern, and alternated which ribbon I used on for each napkin ring.}

This container had a lot of grooves and places where the plastic stuck out at the top, so this is how I wrapped it:

What you’ll need:
Yarn
Plain Ribbon
Patterned Ribbon (smaller width than the plain ribbon)
Mod Podge
Foam Brush
Hot Glue

  1. Starting about ¾ the way up the container (where the bottom of the ribbon will be), apply a layer of Mod Podge with your foam brush about a 1/2 inch wide all the way around the container (don’t do too much at a time or it will dry before you get there).
  2. Wrap the yarn over the Mod Podge, pressing down and squeezing the rows of yarn together as you go.
  3. Once all the glue has been covered, apply another 1/2 inch wide strip of glue and continue applying the yarn over the glue.
  4. Continue this process until you get to the bottom of the jar, and then cut off the ribbon and tuck the end under a previous row so you can’t see it. (Try to be consistent about where you start and end the yarn on the container so you can keep the ends on the back)
  5. Using your thicker, plain ribbon, measure the jar and cut the ribbon so you have about an inch more than you’ll need.
  6. Remembering where the back of your jar is, put a dab of hot glue on the container, and press the end of the ribbon down until it dries.
  7. Wrap the ribbon around the jar and place another dab of hot glue on the ribbon that is already attached to the jar.
  8. Press down the other end of the ribbon until it dries. (You may need to lift the ribbon in a few places around the jar and add some extra hot glue so it doesn’t sag)
  9. Repeat this process with your thinner more decorative ribbon, centering it on the plain ribbon.
  10. Since the top of my jar had so many grooves, I had to apply the ribbon differently from how I did the bottom, wrapping and placing a dab of hot glue every few inches until the top was covered. If you have a more normal container that is flat, you can apply your yarn to the top in the same way you did the bottom.

{The Games}

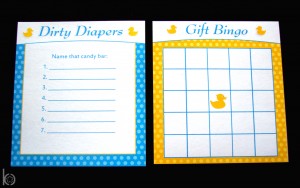
Two of the games we played at the shower required guests to write, so I designed custom duck cards to match the rest of the paper products at the event.

P.S. If you’ve never played the “Dirty Diaper” Game (aka “Name That Candy Bar”), you have to consider planning it for your next baby shower. It’s a great, fun {and somewhat disgusting} baby shower game. :)

{The Décor}

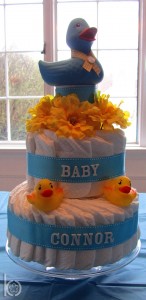
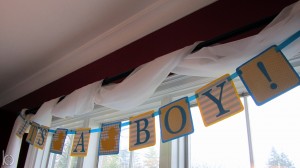
After debating about the centerpiece for awhile, my mom came across the idea of doing a diaper cake.  Like everything else at the shower, we wanted to keep it cute but elegant at the same time, so we decided to match the theme of the shower, rather than using lots of pacifiers, rattles, etc. My mom and I created the diaper cake together, and we were so thrilled with how it turned out!

I made the banner by creating a template for all the shapes and letters on my computer, printing and cutting out each template, tracing them onto scrapbook paper, and cutting them out. It took a long time to do all that cutting, but it was definitely worth it in the end!

Have an event you’d like us to feature on our blog? Feel free to submit photos and information to info@cherryblossomcharm.com :)

DIY Origami Greeting Card Boxes

DIY Origami Greeting Card Boxes

Today I’m going to show you a unique way to repurpose old greeting cards, or even new cards {especially if you’re giving it away… ;) }

I learned this when I was around 7 years old, when I used to hang out with my older sister and her best friend. We used to spend tons of time making these boxes and selling them on the sidewalk in front of our house. It was like our own little lemonade stand. :)


{Make sure you check out the bottom of this post for some great ideas of different ways to use these boxes for around the house or at your event!}

What you’ll need:

  • Greeting card (or heavy paper, see the bottom of my post)
  • Ruler
  • Pencil
  • Scissors

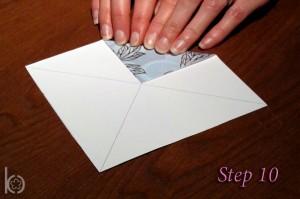
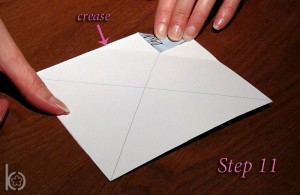
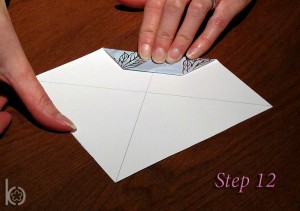
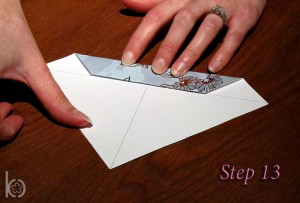
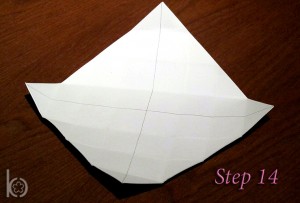
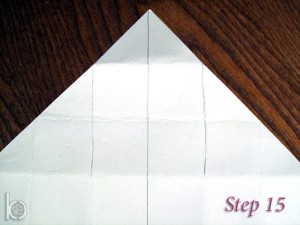
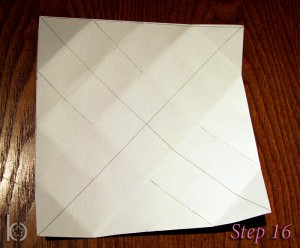
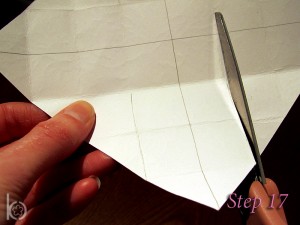
Please keep in mind that this is very difficult to explain through words, so definitely make good use of the pictures I’ve provided!

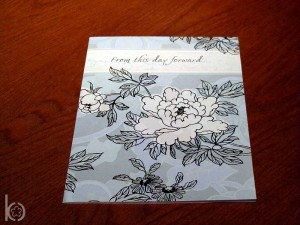
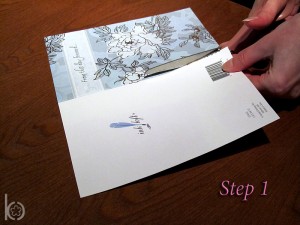
1. Cut the card in half along the fold.

2. Set the back portion of the card aside. Using the front portion of the card, decide what part of the card you want centered on the front of the box.


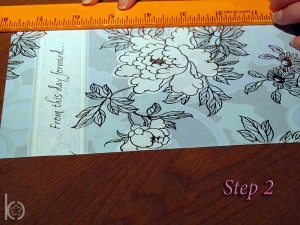
3. Measure the shorter side of your card.

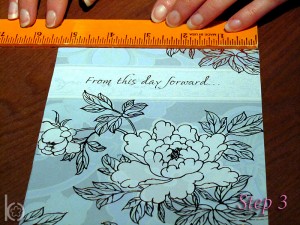
4. Keeping in mind what you want centered on the box, measure the longer side of the card to the same size as the shorter side (for example, if it’s 4”x6” measure the 6” side down to 4”). {We are going to create a square}


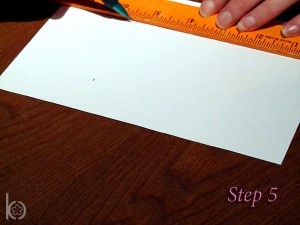
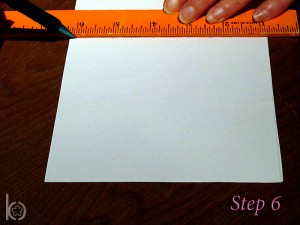
5. Measure a second time on the same side – this will help to ensure your line is straight.

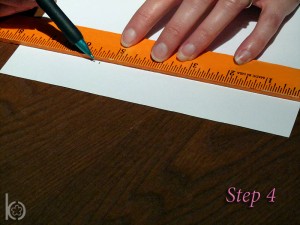
6. Using your ruler, connect the two marks and draw a straight line.


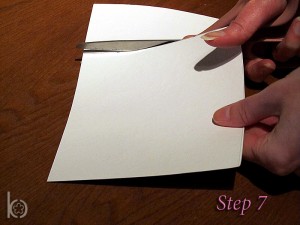
7. Cut along the line to create your square.

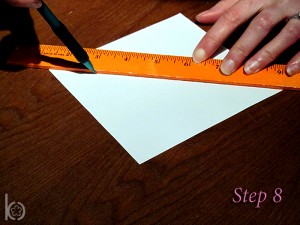
8. Use your ruler to draw a diagonal line from one corner to the other.


9. Repeat with the other corners, creating an “X”

10. Take one of your corners and fold it the center of the “X” (make sure it stays straight)


11. Unfold and then refold the same corner to the crease you just made.

12. Keep this corner folded, and then fold it into the “X” again.


13.Fold into the center one more time (the fold should line up with your diagonal line).

14. Unfold and then repeat this process with the 3 remaining corners.


15. Mark the creases with your pencil as shown in the picture. {This step is optional, and you won’t really need to do it once you’ve practiced}

16. Repeat on the opposite side only (you will not mark all 4 corners)


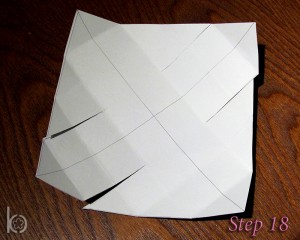
17. Cut along your pencil mark, making sure to stop when you get to the crease

18. Repeat with all of your marks.


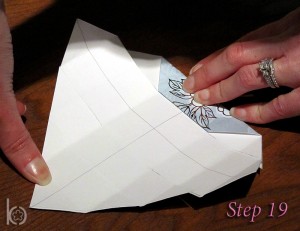
19. Take one of the corners that is not cut (should look like a triangle) and refold it as you had it before.

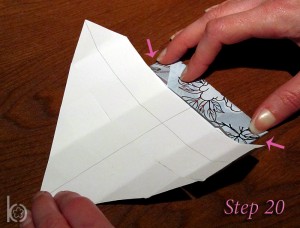
20. Fold in the triangular tabs on the sides.


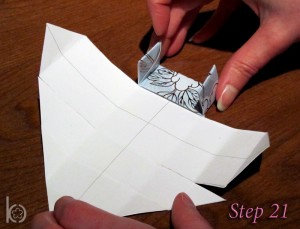
21. Fold in the ends so that they stand upright.

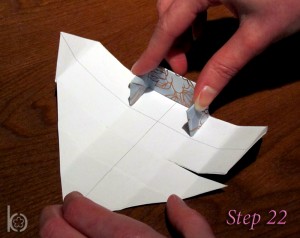
22. Fold upward to create your first side.


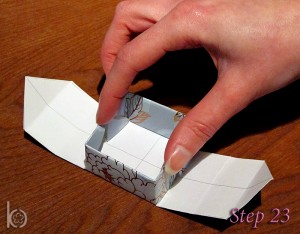
23. Repeat steps 19-22 with the opposite corner, and you should now have a standing square with two “house shaped” ends sticking out.

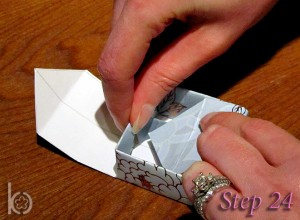
24. Take one of these “house shapes” and fold it up and over the side, pushing it down into the center of the box until it is tight.


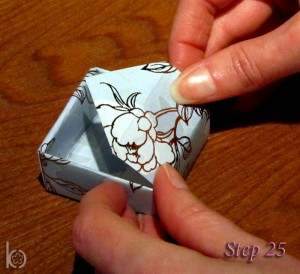
25. Repeat this on the opposite side.

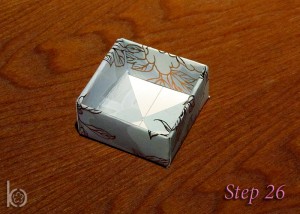
26. Now you should have the top of your box! Set this aside, and get out the back portion of the card that you set aside earlier.


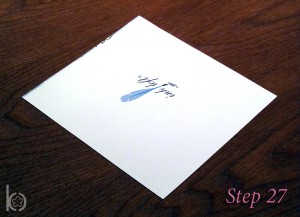
27. Since you probably don’t have a picture you need to center, cutting this portion down should be much easier. MAKE SURE TO CUT IT 1/4” SMALLER THAN THE TOP SO THAT IT FITS INTO THE TOP WHEN ASSEMBLED. (for example, if you measured and cut the top to a 4”x4” square, you will measure and cut the bottom to a 3 3/4”x 3 3/4” square).

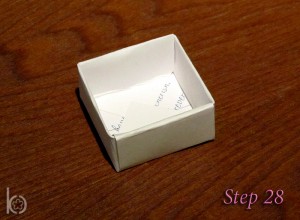
28. Once you have your square cut, repeat the exact same process you used for the top of your box.


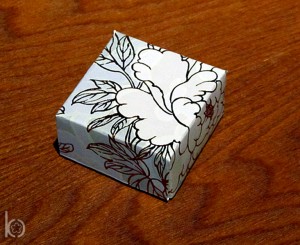
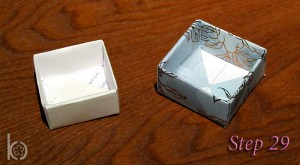
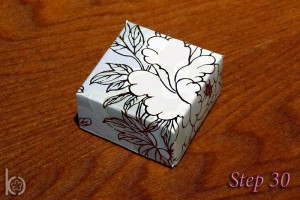
29. You should now have the top and bottom of a box!

30. Put them together and you’re done! :)


*You shouldn’t need any glue or tape to hold your box together, but if you want them to stay secure and not be pulled apart later, then feel free to use some glue. :)

{How To Use These Boxes}

To dress it up a little: Since the inside of your box will show some of your pencil marks, I recommend you make the marks lightly, and then erase the marks once the box is put together. Another way to dress up the inside and not have to erase all the pencil marks would be to cut squares out of paper, felt, or fabric to the size of the inside of your box and glue them in place.

For organization: If you want larger boxes, you can always use a heavier paper (like cardstock), and start with a larger square. You can also use a lightweight poster board for very large boxes! Since you can’t use a really heavy material (like cardboard) because of all the folding, these will not be the sturdiest boxes, but they are still great for organizing small, lightweight items around your house!

For style: If you want boxes in a specific color or design, you could also use a heavy scrapbooking paper! This would be SO cute to use in organizing an office, or around your home! {Plus, most scrapbook paper already comes in a square! Just don’t forget to cut the bottom piece of paper down so it fits in the top – and I only remind you of this because I’ve forgotten before… :) }

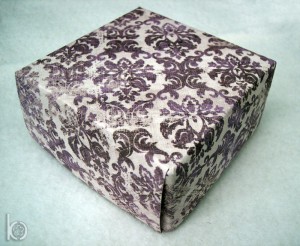
Check out this box I made out of some beautiful 12″ x 12″ scrapbook paper:

To make this box I chose a double sided, heavier paper. I used the detailed side of the paper for the top of the box, and the coordinated back side of the paper {mine was just plain purple} for the bottom of the box. To give you an idea of how big your box will be using 12″ x 12″ paper, this box measures 4 1/4″ by 4 1/4″ when folded.

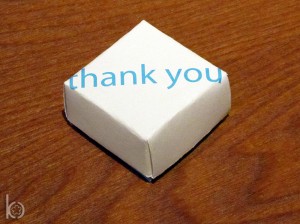
For your wedding: Think about using a thank you card (being sure to center the lid around the thank you) and use it to wrap gifts for your bridal party. Or, if you’re really ambitious, use the box as a favor at the wedding! Keep in mind that if you don’t want to pay a fortune to buy all those greeting or thank you cards, or you want a more customized look (with your name and event date), we have custom, printable box templates for sale in our Etsy Shop!

The DIY Candy Buffet – Part III

DIY Candy Buffet – Part III {The Details}

Now that you’ve got all the important things for your candy buffet (containers, scoops, and candy of course), it’s time for my favorite part – the details! {This will be a slightly longer post as there are lots of fun details and DIY instructions, so prepare yourself. ;) }

{Naming Your Buffet}

Since you already have a theme in mind, it’s time to come up with a name for your candy buffet. Here are a few of my suggestions:

  1. “Love is Sweet” – The most popular name (which I’m sure you’ve heard before), and can be paired with, “take a treat.”
  2.  “A Sweet Ending to a New Beginning” – also very popular.
  3. “Love Sweet Love”
  4. “Sweet Shoppe”
  5. We named ours “Carlson’s Sweet Boutique” because I thought the name was elegant, and different from any name I’d seen before.
  6. “Sweet 16” – obviously for a 16th birthday party ;)

These are just some ideas to get you going, don’t be afraid to get creative in coming up with a name to match your theme!

{The Sign}

Photo by: Love By Serena

For our sign, I purchased a wooden plaque from Michael’s, painted it in our colors, and then had my husband who’s a graphic designer {lucky me ;) } design and cut the letters out of vinyl, and place them on the sign.

The most simple, and probably least expensive, way to do a sign would be to type your desired name into Microsoft Word in a pretty font, print and cut it to size, and place it in a picture frame. Very easy and cost effective!

A second option, that works better if you don’t have a long name, would be to purchase wooden letters (found at your local craft store) and paint them in your colors. An example would be to purchase the letters for the word “love” or “sweet,” and then you can paint them in one color, or you could get fancy and paint a pattern on them!

{Labels}

Now that you have all the candy, you need to label it so guests know what they’re taking!

There are ways you can design your own labels in Microsoft Word, or you could even buy escort cards from a store like Michael’s, label them with your candy, and attach them to ribbon.

If you are interested in purchasing custom labels, we have several for sale on our Etsy shop!

{How to Attach the Labels}

I used two different ways to attach the labels, depending on shape of the vase.

For containers with lids or more of a “vase-like” shape:

  1. Cut a small horizontal slit (approx. 1/2” long) above the text on your label.
  2. Use your spool of ribbon and wrap a length of ribbon around the vase, and cut to the desired length.
  3. Thread both ends of the ribbon through the slit on the front of the label.
  4. Place a small piece of double sided tape on the back of the label and secure the ribbon to the double sided tape so the label won’t slide off.
  5. This will create your loop, and then you just place the loop over the jar or lid

*If you don’t want the label to hang so low, you can always cut the ribbon shorter in the first step so that the label is on top of the lid, rather than in front of the jar.

(click on photo to expand)

For “bowl-like” containers without a lid (where the first method isn’t possible):

  1. Cut a small horizontal slit (approx. 1/2” long) above the text on your label.
  2. Cut a small piece of ribbon from your spool (approx. 4”). I used a thicker (5/8”) ribbon so it didn’t feel as flimsy.
  3. Thread one end of the ribbon through the slit on the front of the label.
  4. Place a small piece of double sided tape on the back of the label and secure the ribbon to the double sided tape so the label won’t slide off.
  5. Attach the other end of the ribbon to the inside of the container with a piece of regular tape (you won’t be able to see this because the label should hang in front of it on the outside).

*If you find that the label “pops out” too much from the jar, you can use another piece of double sided tape to secure the label/ribbon combo to the outside of the jar.

(click on photo to expand)

Of course, there are other methods to attaching the labels, but these are the two I chose to use for my own buffet. :)

{Decorating The Scoops}

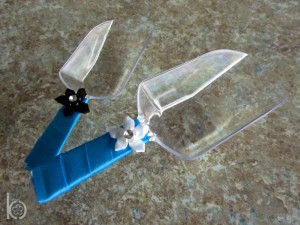
We wound up buying the inexpensive plastic scoops rather than spending the money on a more expensive metal scoop.To dress them up a little, this is how I decorated them.

Photo by: Love By Serena

What you’ll need:
Ribbon
Hot Glue
Flower or other small embellishment (optional)

  1. Starting near the scoop, on the back of the handle, begin wrapping the ribbon around the handle until you get to the end (DON’T GLUE OR CUT ANYTHING YET). The ribbon will overlap itself slightly. This will give you an idea of how much ribbon you need.
  2. Cut the ribbon slightly longer than you think you’ll need to allow some room for error.
  3. Using hot glue, attach the ribbon to the back of the handle near the scoop (just like you practiced), and allow a few seconds for it to dry.
  4. Wrap the ribbon all the way around the handle one time.
  5. Begin wrapping a second time around, this time placing a small amount of glue on the ribbon that’s already wrapped.
  6. Press the ribbon down onto the hot glue and allow a few seconds for it to dry.
  7. Repeat this process all the way down the handle.
  8. Secure the end of the ribbon neatly to the end of the handle with hot glue.
  9. Cut off any excess ribbon.
  10. Hot glue your embellishment on the end of the handle nearest to the scoop.

Here is a close up picture I took so you can see exactly how I wrapped the ribbon:

Simple. Easy. Cute. :)

{Creating Visual Interest}

There are several ways you can create more visual interest on your table. The first of these ways is to use a variety of table linens. My reception venue provided the white tablecloth, but I was able to find extra fabric in my colors and draped the fabric across the table. This helps to tie in your color scheme, and is much more interesting than having a white tablecloth!

The second way to create visual interest is to play with height. I found several sturdy boxes (it is important that they are strong and sturdy enough to support a glass jar full of candy, as you don’t want the jar falling over!), and placed them under the table linens. Obviously, it’s best to put the boxes in the back so that the height of those containers doesn’t make it difficult to reach the other containers.

Some other ways you can add to the table would be to include another centerpiece, candles (that people can’t knock over easily if they’re getting candy!), or even sprinkle some crystals around the table (I found my crystals at Michael’s).

I’ve already shared a photo of my candy buffet, but I’d like to share it again to demonstrate some of the things I just mentioned.

Photo by: Love By Serena

Now that my series on The DIY Candy Buffet is complete, I’m giving you a PDF checklist of all the things I mentioned in my last 3 posts. Hopefully this will help you to remember all these little details!

Tired of seeing the candy buffet? Here are some fun alternatives:

  • Make Your Own Sundae Buffet (this will take A LOT of planning, and could be tricky, but a cute idea)
  • Cookie and Baked Goods buffet (great because you can save money by doing your own baking)
  • Snack Bar
  • Create Your Own Trail Mix
  • Decorate Your Own Cupcake (or cookie) Bar
  • Popcorn Bar
  • Make Your Own Candy Apple Bar
  • S’mores Bar

Up Next: DIY Origami Greeting Card Boxes

The DIY Candy Buffet – Part II

The DIY Candy Buffet – Part II {Building Your Buffet}

Now that you’ve gotten started, it’s time to get down to all of the fun (well, sort of) logistical “stuff”…

{The Candy}

It’s never too early to start looking for candy that you want to include, but be careful to think about the shelf life of the candy so that it is fresh for your event. Check out this article to get an idea of the shelf life of different candies. Keep an eye out in the bulk section of local grocery stores, or a member-only retail warehouse, and don’t be afraid to look online. Keep in mind that all online orders should be placed at least a month before the event to make sure the candy arrives in time!

These are the online stores I used, and I highly recommend them! They are also great for finding candy in specific colors.

http://www.ohnuts.com
http://www.candywarehouse.com

Always comparison shop to make sure you are getting the best deals! I found many things were cheaper in the grocery store than they were online. ;) You can also find some great deals on candy right after holidays!

If you are including chocolate candy in your buffet, be careful ordering it online (especially in the summer months, or if you live in a warmer climate). I bought all of my chocolate candies in the store so I wouldn’t have to stress about them melting. It’s your choice, but if you do order them online you may have to include an icepack in shipping.

If you’re having an outdoor event where/when it will be warm, you may even want to steer away from chocolate completely so it doesn’t melt during the event! The same could also happen if the candy is kept inside in direct sunlight, so be careful where you put the buffet table!

{How Much to Buy}

This is a tough question, and it all depends on how much candy you want to give your guests. In my previous post I discussed having a larger buffet where guests can go all out, or a smaller buffet where guests can only take one small bag, so the answer to this question varies on how you decide to run the buffet.

I chose to do the smaller buffet and leave the bags at guests’ place setting, offering one bag per person. We had around 120 guests, and I bought around 30-35 lbs of candy total (roughly ¼ pound per guest), and I had plenty of candy! It also depends on the types of candy you provide. We didn’t buy as many rock candy sticks as we did Hershey Kisses because the rock candy was more expensive, and the rock candy went quickly! If you’re doing the smaller buffet, I would recommend estimating around ¼ – ½ a pound of candy per guest, adding up the total pounds of all the candy you buy.

If you choose to do the larger buffet and provide unlimited large bags on the buffet table, you’ll need to buy a lot more candy. Obviously it depends on how many guests you’re having, but I would recommend at least 10-20 lbs of each type of candy for a large event.

There’s no real formula for figuring out how much candy to buy, but use your best judgment and take into consideration the size of your bags, how many bags guests are allowed to take, and most importantly how many guests are attending your event!

{Getting the Candy Out}

Along with buying containers, you will also need to think about how guests are going to get the candy out of the containers. The rule is that if a candy is wrapped you don’t need a scoop or tongs, but if I candy is unwrapped then you must offer them a scoop or tongs. Make sure you have a separate scoop or tong for every candy that needs one.  Like the containers, it’s never too early to start looking deals on scoops and tongs!

{Make sure you tune in for my 3rd post about the DIY Candy Buffet where I’ll be giving some tips on how to decorate your scoops. ;) }

Photo By: Love By Serena

{The Bags}

Don’t forget that your guests will need something to keep their candy in after they’ve gone to the candy buffet. Here are some suggestions:

  1. Mesh favor bags (the ones you see at a lot of weddings). This is what we used, and I found them here. I recommend getting the larger bags (at least 4×6 inch) and not the typical 3×4, as they won’t hold much candy at all. We used the 4×6, and they worked perfectly!
  2. White favor bags (similar to small white lunch bags).
  3. Tin tie bags are also great, and similar to the white paper lunch bags. You can find them here.
  4. Small favor boxes, found here and here.
  5. I’ve also seen people who use the small take-out boxes, found here.

This is also a great resource for finding all types of favor bags and boxes.

Keep in mind that all these options, except the mesh bags, can be dressed up with a small sticker, or paper decal attached with glue, or even a stamp! If you choose the mesh bags, you can always attach a piece paper to the ribbon.

{Remember, we have favor tag options available at our Etsy Shop, so feel free to check them out!}

{Creating the Layout}

Once you’ve started accumulating jars, baskets, buckets, pails, or whatever you are using, I would begin to lay them out on a table and see how they look together. Start playing around with different arrangements, and make sure all of the containers are accessible. The best way to do this is to keep shorter containers in the front, and taller ones toward the back. You should also begin to consider what types of candy will go in each jar. If the candy is unwrapped and needs a scoop, make sure there is enough room to actually scoop out of the jar. If the candy is unwrapped and guests can use their hands, make sure the opening isn’t so tight that they don’t be able to get their hand back out!

Having a general idea of which type of candy will go best in each jar will definitely help once you start purchasing the candy. Take into consideration the size of the candy and how many pounds of the candy it will take to fill the jar. *When ordering your candy, keep in mind that a pound of one candy may not fill the same amount of a container as a pound of another candy. I found this video extremely helpful when ordering my candy!

Once it gets closer to your event, and you’ve bought your candy, you should do another trial run with the candy. Doing this a week or two before your event allows you to plan out where the candy will go, and what candy fits best in each container (and hopefully you won’t discover that you need to buy more!). I even opened some of the pictures of my jars (that I took earlier on in my planning) into the Paint program on my computer and typed out which candy I was putting in each jar, creating a map of my buffet before I did this trial run with candy {I know, I’m a geek ;)}

Also, be sure to start thinking about where the table with your candy buffet is going to be set up in your venue. If your venue has a planner that is assisting you, I’m sure they will have some great suggestions!

That’s all for today, next time it’s our final segment on this topic, The DIY Candy Buffet – Part III {The Details}. I can’t wait to share this one! :)

The DIY Candy Buffet – Part I

The DIY Candy Buffet – Part I  {Getting Started}

Candy buffets have become extremely popular, not only for weddings, but also for bridal and baby showers, birthday parties, graduation parties, and more. While there are businesses out there that can help you create your candy buffet, the DIY version is definitely more affordable, and isn’t it more fun to plan your own buffet?!

I was thrilled with how my buffet came together, so I’ll take this opportunity to show it off. ;)
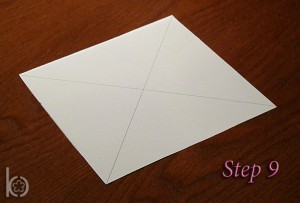
Photo by: Love By Serena

I’ve had a lot of people ask me for some tips on how I pulled mine together, and these are some of the tips I’ve shared with them. Hopefully my suggestions will help to keep you organized, and alleviate some stress during your planning!

{The Theme}

You should decide early on what you want your candy buffet to look like. Obviously, the theme of your buffet should tie in with the theme of your event. Here are some candy theme options you can consider:

  1. A one color candy buffet (i.e. all white candy) – great for a very elegant event!
  2. The most popular choice, a candy buffet that matches your wedding or event colors – this can be very elegant, but you can also find ways to keep it fun and playful (depending on what candy you choose). You could also use your colors but in many different shades.
  3. A buffet using fun bright colors – this would be great for a tropical or carnival themed wedding or event.
  4. A theme based on the type of candy, for example your current or childhood favorite candies (a great idea for a birthday party – selecting candy from different decades of the person’s life).
  5. A blue or pink themed candy buffet for a baby shower

There are endless possibilities, and the choice is up to you, but save yourself some stress down the road by deciding which direction you want to go in early on in your planning.

{The Logistics}

We didn’t have any issues at our wedding, but I’ve heard many stories of guests taking way more than their fair share, risking running out of candy. This obviously has to do with how you choose to run your candy buffet. There are a few choices here, and neither choice is wrong, as long as you are prepared either way!

  • Option 1 – A Larger Buffet: Buy tons of of candy (you can always get lots of the “penny” candy in bulk as this works well), give your guests larger bags (think small paper lunch bags), and allow them to go to town. This is great if you want to offer your guests lots of candy.  {You can serve the buffet before the meal (great for a wedding when you want to keep guests happy, and full, while they’re waiting for the bridal party to arrive at the reception), or you can serve the buffet after dinner when they’re getting ready to head home.}

Tips to be prepared for this type of buffet:
1. Leave the bags on the buffet table (keep in mind that some people will take more than one bag, and others may only take one bag per couple/group).
2. Have someone ready to refill the jars when they get low (keep extra candy under the table for easy access).
3. Buy lots of candy!
4. Keep in mind that it may be hard to keep to a color theme with “penny” candy.

  • Option 2 – A “Smaller” Buffet: Buy less candy, and give your guests smaller bags to fill. This is what I opted to do for our wedding because I didn’t want to spend a fortune on candy.

Tips to be prepared for this type of buffet:
1. Serve the candy after the meal so guests are already full and less likely to take as much candy. This is a great way to say “thank you” at the end of the event, and you won’t have to buy as much candy.
2. If you choose to serve the candy after the meal, make it clear that it won’t be open until after the meal. I kept ours covered with tulle until we were ready to open it up to people, but I’ve heard of others keeping it hidden in another room and bringing it out when it’s time.
3. Give one bag to each guest and leave it at their place setting, this way they know they only get 1 bag. You can always include a cute poem on the bag as a polite way of saying, “please wait until after dinner.” *
4. Buy lots of candy (but not as much as the larger buffet)

*Like the idea of using the poem and favor tag on your bags? Check out this listing in our Etsy Shop!

{The Jars}

As soon as you decide you want to have a candy buffet at your wedding or event, I would begin looking for great deals on jars. I found some beautiful jars at places like Ross, TJ Maxx and Marshall’s for $5-$10 a piece (you can always sell them after the event). Certain vases (so long as the opening is large enough) will work well, and you can always find vases at the dollar store. Another option is to ask friends and family members if they have any you could borrow. Over half the jars used in my candy buffet were ones I borrowed from family members, so don’t be afraid to ask around! {Some around the house jars that work well: truffle bowls, bowls used for candles or centerpieces, and of course, vases! Keep a look out for jars around your home that could work for you!}

However you find your jars, make sure you think about how people will get the candy out of them. If the opening is too narrow, your guests may need tongs to get the candy out, or it may not work at all. Also, make sure to pick a variety of sizes to create a more interesting look on your table (too many like-sized jars will make it difficult to see and access all of the candy).

Keep in mind that there are alternatives to glass jars that could be much cheaper, and a better fit for your theme. Here are a few suggestions:
-Baskets (great for a country or rustic theme)
-Buckets (also great for a country or rustic theme)
-Pails (great for a beach or tropical theme)
-Flower pots
-Boxes wrapped in wrapping paper – without lids, or course (great for a seasonal theme) {Just make sure to think about decorating the inside of the box with wrapping paper or felt, you still want it to look pretty once the candy is being taken out!}

The possibilities are endless, so get creative!

Since there are many details involved in creating your own candy buffet, I’m breaking this topic up into several posts, so stay tuned for parts II and III!

Up Next: The DIY Candy Buffet – Part II {Building Your Buffet}!